The $800 Mistake Flippers Make With Chalk Paint Cabinets
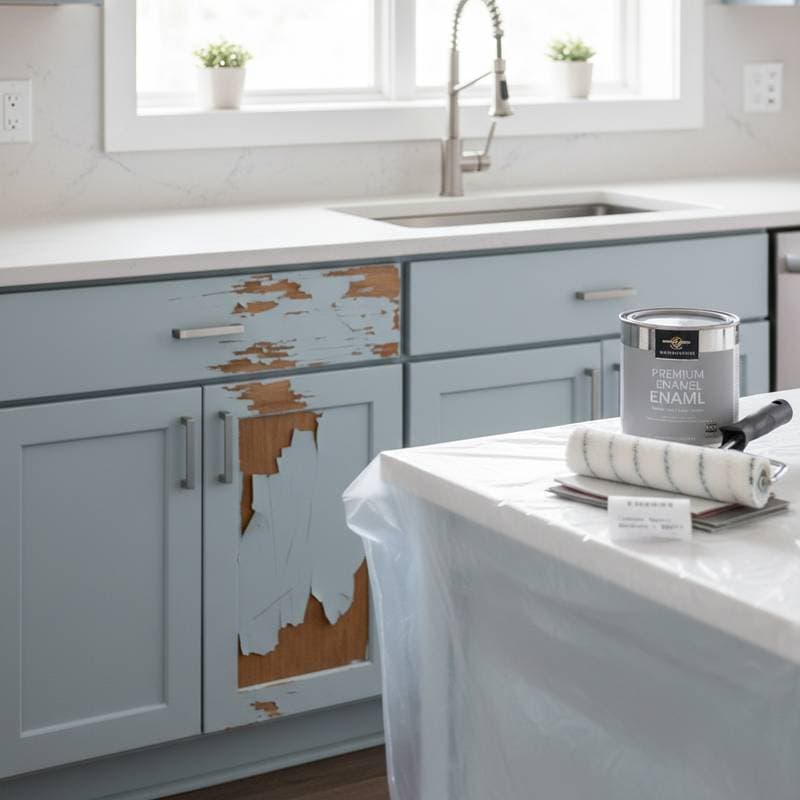
There is a moment every house flipper dreads. You walk into your freshly updated kitchen, the one you painted in a rush with chalk paint, expecting that dreamy matte farmhouse finish. Instead you find streaks, chipped corners, and a sticky feel that never quite cures. That is the $800 mistake. It sounds dramatic, but it is real. Chalk paint can be beautiful, but on cabinets it is a trap if you do not respect the prep and the product.
Why Chalk Paint Feels Like a Shortcut
Chalk paint has huge appeal for flippers and DIYers. It goes on thick, covers fast, and looks gorgeous on camera. No sanding and no priming seem ideal in a time crunch. You can brush it on in the morning and stage the property in the afternoon. It reads well in listing photos with its soft matte vintage vibe.
Cabinets are not dressers. They are high touch, high traffic surfaces that take abuse every single day. Oils, steam, crumbs, and constant handling all attack that delicate chalk surface. Without proper sealing and surface prep, chalk paint on cabinets starts failing in weeks. That is when flippers call in pros to fix the paint job. The average rework cost runs around $800 in labor and materials.
What Actually Goes Wrong
The issues usually come down to one or more of these problems.
- Skipping degreasing. Kitchen cabinets collect invisible grease. Even if they look clean, oils block paint adhesion.
- No primer. Chalk paint grips porous surfaces, but factory finished cabinet doors have slick coatings. Without bonding primer the paint simply sits on top.
- Wrong topcoat. Wax looks dreamy but offers minimal protection in a kitchen. It softens with heat and collects grime.
- Uneven application. Chalk paint dries fast. Miss a spot or overwork a section and you will see patchy texture under bright light.
- Rushing cure time. Even with good primer and topcoat, painted cabinets need time to harden. Moving hardware back too soon causes dents and chips.
The Smart Way to Use Chalk Paint
If you are still set on that chalky matte look, there is a right way. It takes a few more steps but saves hundreds of dollars.
Step 1: Deep clean thoroughly. Use a degreaser like TSP substitute or Krud Kutter. Wipe twice. Rinse with clean water. Let dry fully. This step alone can double your paint lifespan.
Step 2: Scuff sand. Even if the label says no sanding needed, do it anyway. A light sand with 220 grit paper creates micro grip for primer. Vacuum dust, then wipe with a tack cloth.
Step 3: Use bonding primer. A high adhesion primer like INSL X STIX or Zinsser BIN gives chalk paint something to hold onto. One coat is plenty, but make sure it is even.
Step 4: Choose the right chalk paint. Not all chalk paints are equal. For cabinets, pick one with built in acrylic for durability. Annie Sloan and Rust Oleum both have versions that work well when sealed properly.
Step 5: Seal with polycrylic, not wax. Wax is fine for furniture but terrible for kitchens. A water based polycrylic topcoat keeps the matte look while adding protection. Two light coats are better than one thick coat.
Step 6: Cure before use. Give cabinets several days to harden before reinstalling doors or hardware. That patience prevents chips later.
Budget Breakdown: What Each Approach Costs
The rushed chalk paint job costs about $75 in materials. One quart of chalk paint runs around $40, wax or light sealer $20, and brushes and rollers $15. It seems cheap. When the finish fails, repairs run about $800 or more.
The durable chalk paint job costs roughly $135. Degreaser and sandpaper run $15, bonding primer $35, quality chalk paint $40, polycrylic sealer $25, and supplies $20. That extra $60 up front prevents the $800 redo.
The pro option involves hiring a professional painter. Cabinet refinishing usually costs between $2,000 and $4,000 depending on size and condition. You get a factory smooth finish that lasts for years.
When Chalk Paint Is the Wrong Choice
Some surfaces just do not play well with chalk paint at all. Thermofoil cabinets have a plastic coating that peels under paint. It is better to replace or reface these. Laminate presents tricky adhesion even with primer. Use enamel or urethane based products instead. Heavy use kitchens in rental units or large families need tougher finishes like urethane or two part epoxy coatings.
Quick Fixes When You Have Already Made the Mistake
Assess the damage first. Light scratches can be spot sanded, primed, and touched up. Strip wax before repainting because wax blocks new coats. Use mineral spirits or a wax remover. Once wax is gone, apply bonding primer before switching to a stronger paint. If your paint looks good but feels soft, seal with polycrylic now. Two coats can save the finish. You will spend a few hours and about $40 in materials.
Media Tested Secrets for a Photo Ready Finish
Use satin or matte topcoats. Too shiny looks plastic while too flat shows fingerprints. Paint doors horizontally so gravity prevents drips. Stage with warm lighting to soften texture irregularities and make colors richer. Warm whites and soft grays hide minor wear better than pure bright white.
Protecting Your Flip ROI
Every design choice affects your return on investment. Paint failure on cabinets does not just cost $800 in repairs. It delays listing, pushes back closing, and eats holding costs. Smart flippers treat paint as an asset, not an afterthought. Build a materials list that works across properties. Stick to proven products and finishes that match your target market. Keep samples of your successful combos. That consistency saves time and supports your brand.
When you treat your paint like part of the home structure, not a quick cover up, you create lasting value. The matte look of chalk paint can still be part of your strategy with the right prep and protection. Test it on a small panel, check adhesion, and topcoat properly. Design is about problem solving, not shortcuts.