The $800 Drywall Sanding Blunder DIYers Face in 2025
Drywall sanding appears straightforward. It involves some dust and effort to achieve smooth walls ready for paint. However, one common mistake can lead to an $800 repair bill. This cost arises from cleanup, repainting, and time lost. The issue is entirely preventable through proper preparation and techniques. This guide explains how to maintain flawless walls and preserve your budget.
The Hidden Cost of a Quick Sand
Many DIYers select a power sander, neglect dust control, and proceed without caution. Fine drywall dust then infiltrates cracks, electrical outlets, vents, and adjacent rooms. It settles on furniture, electronics, and floors. When combined with moisture, the dust can cause stains on surfaces. Homeowners often hire cleaners, painters, and HVAC specialists as a result. The total expense frequently exceeds $800 for what began as a simple task.
The error lies not in the sanding action but in the absence of a comprehensive system. Effective sanding requires control, patience, and timely cessation.
Why Dust Control Matters
Drywall dust consists of ultra-fine particles. These particles evade standard vacuums and rapidly clog filters. Unlike sawdust, the particles remain airborne for extended periods, spreading unnoticed until a haze appears on surfaces like television screens. This dust diminishes paint vibrancy and produces uneven light reflections. In practice, it renders a well-painted wall appear chalky.
Professionals in painting and finishing recognize that a clean surface yields a superior finish. Dust management integrates into each phase of the process. Although unglamorous, this practice distinguishes acceptable results from exceptional ones.
A Three-Budget Approach to Dust Control
Effective drywall sanding accommodates various budgets. The following options scale from basic to advanced setups.
Low-Budget Option: Manual DIY Method
Acquire a sanding pole, fine-grit sanding sponge, and plastic drop cloths. Secure vents and doorways with painter's tape. Vacuum lightly between sanding sessions using a shop vacuum equipped with a HEPA-rated bag. Maintain slight window openings to promote airflow. This approach demands more manual work but effectively minimizes dust dispersion.
Mid-Budget Option: Powered Hybrid System
Purchase a drywall sander featuring a built-in vacuum port. Attach it to a shop vacuum with a HEPA filter. Protect floors with reusable drop mats and wipe walls with a damp cloth after each pass. This configuration captures the majority of airborne dust while accelerating the sanding process. Smoother surfaces emerge with reduced mess.
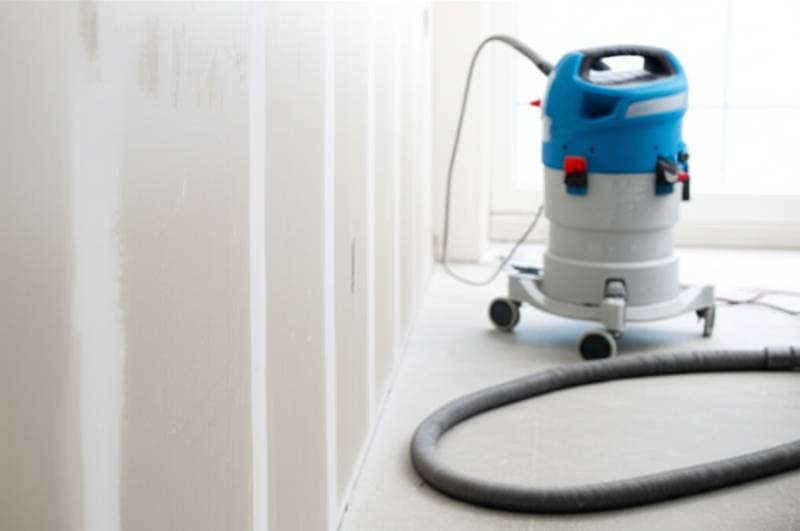
High-Budget Option: Dustless Professional System
Opt for a dustless drywall sanding system, available for rent or purchase. These units integrate suction, advanced filtration, and sanding heads that form a seal against the wall. Incorporate a portable air scrubber to trap remaining fine particles. This method delivers a nearly dust-free environment and simplifies cleanup. It suits projects in occupied homes or open layouts.
Each strategy succeeds when executed with attention to detail. Avoid unnecessary expense, disorder, and regret.
Essential Techniques for Time and Surface Preservation
Professionals employ these methods to maintain control throughout the process.
-
Illuminate the Work Area Thoroughly
Position a work light at a low angle to identify uneven areas. This illumination reveals imperfections visible under natural or accent lighting post-painting. Surfaces that appear smooth in angled light will perform well after application. -
Select Appropriate Grit Levels
Begin with medium grit for joint compound edges, then transition to fine grit for a uniform finish. Coarse grits risk scratches visible through paint layers. Excessively fine grits can create a surface too slick for optimal paint adhesion. -
Sand in Defined Zones
Segment the wall into manageable sections. Complete sanding and cleaning for one area before advancing. This prevents dust migration and facilitates progress monitoring. -
Feather Edges Gently
Employ broad, overlapping strokes with the sander. Avoid excessive pressure, which produces depressions noticeable after painting. Allow the tool or sponge to perform the smoothing without aggressive carving. -
Conduct Pre-Paint Inspection
Sweep a bright light or hand across the wall to detect ridges or bumps. Any tactile irregularity will manifest once painted. Address issues at this stage to eliminate the need for repainting.
A Practical Example from Professional Production
In one instance, a team refinished a compact living room within a single day for a filming schedule. Dust posed an unacceptable risk with cameras active from morning. The approach involved a dustless sander with inline filtration, supplemented by an air scrubber. Crew members donned lightweight respirators, and the area sealed with zipper plastic sheeting. Upon completion, the air remained clear, and the space appeared pristine on camera. This precision level applies equally to home projects, elevating everyday results to professional standards.
Reasons DIYers Overlook Dust Management
Sanding drywall seems uncomplicated, leading to underestimation. Individuals concentrate on the apparent surface while ignoring airborne particles. They often plan to vacuum afterward, but by that point, dust has permeated all areas. The subsequent cleanup and repainting expenses rival or surpass professional hiring costs. Resolution demands awareness rather than advanced skills.
Safe Practices to Gain Confidence
When introducing a new sander or dust control device, test it on scrap drywall sections. Observe suction efficiency, dust escape levels, and post-wipe surface quality. Refine pace and pressure accordingly. These trials avert major errors and help develop a technique for ideal feathered edges.
Business Perspective on Dust Control
From an entrepreneurial viewpoint, additional cleanup time erodes profitability. Professionals favor consistent systems that yield rapid, clean outcomes. For contractors or dedicated DIYers, dustless equipment recoups investment swiftly. Clients value the tidiness of a project alongside its aesthetic appeal. Such reliability fosters trust and expands opportunities.
Complementary Surface Preparation Steps
Sanding represents one element of thorough surface preparation. Enhance results by incorporating:
- Joint Examination: Seal pinholes prior to sanding.
- Primer Application: Employ drywall sealer to uncover concealed imperfections.
- Moisture Assessment: Verify wall dryness before any coating.
- Edge Safeguarding: Protect corners and trim using tape or corner beads.
These measures amplify subsequent quality. Meticulous preparation ensures paint delivers a luxurious appearance. Craftsmanship emerges through these integrated efforts.
Maximizing the Benefits of Prepared Surfaces
After dust settles, experience the renewed freshness of your space. Clean walls enhance light reflection, preserve color accuracy, and improve air quality. Retain a sanding sponge for minor adjustments and organize dust control tools for future use. Each endeavor imparts lessons that bolster proficiency. Superior outcomes require investment in process, not shortcuts that incur hidden costs.
Approach drywall sanding methodically for a controlled, efficient experience. Prevent the $800 oversight through informed practices.


