Why 220-Grit Sanding Delivers Pro-Level Paint Finishes
A superior paint finish relies on more than color selection or coat application. Preparation forms the foundation, with sanding serving as the core element. Among various grits, 220-grit emerges as essential for creating smooth, professional surfaces that promote strong paint adhesion without underlying damage.
Homeowners and contractors alike benefit from mastering 220-grit application. This guide details its importance, integration into preparation workflows, and practical usage methods to yield refined, enduring results.
Sandpaper Grits Explained
Grit numbers indicate abrasive particle size on sandpaper. Coarse options, such as 40 or 80, remove material rapidly for initial shaping or stripping. Finer varieties, including 180, 220, and 320, focus on refinement and smoothing.
Each grit targets a distinct preparation phase. Coarse abrasives address major flaws like old paint layers. Medium grits level surfaces and smooth fillers. Fine grits like 220 prepare for final coatings by eliminating subtle marks. Proper sequencing prevents visible scratches from telegraphing through paint.
Positioning 220-Grit in Surface Preparation
Sanding establishes the base for even paint application and longevity. Position 220-grit as the concluding step prior to painting. It polishes after coarser passes, erasing fine scratches and fostering a consistent texture.
This grit suits wood, drywall, and repainted areas by balancing smoothness with grip. Excessive coarseness hinders even spreading; over-fineness risks poor bonding. At 220-grit, surfaces achieve refinement that supports durable finishes.
Project Cost Overview
Typical Price Ranges
- Basic preparation for small walls or trim: $150 to $300
- Full prep for several rooms or wood details: $300 to $700
- Advanced sanding with multiple stages: $700 to $1,200
Standard Inclusions
- Surface cleaning and assessment
- Coarse removal of defects or prior layers
- Gradual progression to finer grits
- Final 220-grit refinement
- Dust extraction and wipe-down
Additional Expenses
- Structural repairs like crack filling or wood mending
- Precision work on ornate trim or cabinets
- Specialized primers for glossy outcomes
- Extra effort for expansive or irregular areas
Influencing Factors
| Factor | Impact Level | Specifics |
|---|---|---|
| Starting surface state | Moderate | Layered paint or warped wood demands more time |
| Substrate material | Moderate | Dense hardwoods or textured plaster extend labor |
| Scope of work | High | Full-room coverage multiplies costs |
| Desired smoothness | High | Mirror-like results require extended grit cycles |
| Site challenges | Low to moderate | Elevated access or confined spaces complicate execution |
Enhancing Adhesion Through 220-Grit
Effective paint bonding hinges on surface profile. 220-grit generates minute anchors that secure paint layers mechanically. These subtle grooves prevent delamination over time.
Rough textures cause pooling and inconsistencies; glossy ones weaken attachment. 220-grit optimizes this equilibrium, yielding a tactile smoothness that cures into a robust coating.
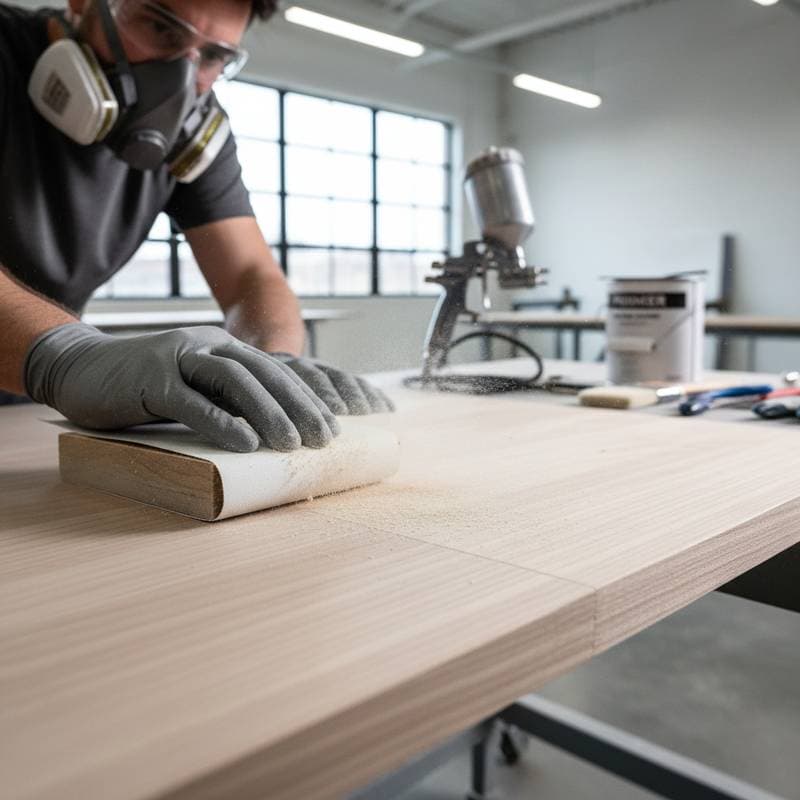
Executing 220-Grit Sanding Correctly
Initial Cleaning
Remove contaminants like dust, oils, or debris first. This action avoids abrasive clogging and surface marring during the process.
Sequential Grit Application
Avoid starting with 220-grit on unprepared areas. Initiate with 100- or 150-grit for bulk removal, advance to 180-grit, then conclude at 220. Each level refines prior imperfections progressively.
Maintaining Even Force
Distribute pressure uniformly to prevent dips or ridges. Rely on the sandpaper's action rather than brute force. Employ blocks or powered sanders for broad, level results.
Directional Techniques
Align strokes with wood grain to evade cross-patterns. For drywall, incorporate circular passes to integrate joints seamlessly.
Interim Dust Management
Vacuum or tack-wipe after every grit change. Residual particles compromise subsequent steps and final paint integrity.
Applying 220-Grit Between Coatings
Incorporate light 220-grit passes between primer or paint layers. This removes nibs, marks, or contaminants, fostering interlayer grip. High-sheen finishes particularly gain from this for defect-free appearances.
Perform with restrained pressure, followed by meticulous cleaning. Outcomes include cohesive, velvety surfaces.
Ideal Surfaces for 220-Grit
Wood Applications
This grit seals wood pores while preserving adhesion texture. It excels on cabinetry, moldings, and furnishings.
Drywall Finishing
Smooth compounds and blends without paper tears. It ensures wall uniformity pre-painting.
Metal Preparation
Eliminate light corrosion for primer readiness. The result supports extended coating life.
Repainting Existing Layers
Scuff gloss to receptive profiles, enhancing new paint performance and coverage.
Weighing DIY Against Professional Approaches
DIY Benefits
Tackle modest tasks like door or trim prep affordably. Manual or basic powered sanding with 220-grit proves accessible.
Pro Strengths
Large-scale or detailed work demands expert consistency. Pros deploy advanced vacuums, tools, and methods for pristine, low-mess execution.
Expense Analysis
DIY limits outlays to supplies but demands personal investment. Hired prep costs $1.50 to $3.50 per square foot, justified by reliability and reduced rework.
Setting Up for 220-Grit Success
Essential Equipment
- 220-grit sheets or discs
- Rigid blocks or random-orbit sanders
- Vacuum systems
- Tack or lint-free cloths
- Safety gear including masks and goggles
Workflow Sequence
- Evaluate and mend surface issues.
- Employ coarser grits for initial leveling.
- Transition to 220-grit refinement.
- Eradicate all residue.
- Illuminate areas to detect anomalies.
Pitfalls to Sidestep
- Abrupt grit jumps that retain coarse traces.
- Overzealous sanding leading to slickness.
- Overlooking particle clearance.
- Inconsistent force creating variances.
- Neglecting perimeters and angles.
Verifying Readiness for Painting
Post-220-grit, examine under bright light and tactilely. Seek uniformity without snags or gloss patches. Re-sand and cleanse any discrepancies prior to proceeding.
Optimizing Your Painting Timeline
Allocate ample duration for prep phases, including the 220-grit finale. Rushed efforts invite flaws; deliberate pacing minimizes corrections.
When engaging pros, inquire about grit protocols. Emphasis on staged sanding signals quality focus. Verify inclusions for dust handling and inspections to safeguard outcomes.
Key Questions Answered
Why Prioritize 220-Grit Pre-Paint?
It crafts a profile merging polish with grip, averting coverage issues and failures.
What Are Pro Prep Costs?
Rates span $1.50 to $3.50 per square foot; projects vary from hundreds for details to over $1,000 for walls.
Sand Between Coats?
Light 220-grit use clears imperfections and boosts bonding, vital for sheens.
Universal Material Suitability?
Effective across wood, walls, metals, and repaints; adjust technique per softness.
Consequences of Omission?
Expect patchy application, persistent marks, or detachment from unrefined bases.
Completion Indicators?
Surfaces exhibit even silkiness, residue-free wipes, and no defects under scrutiny.