- Upgraded HEPA filters and disposable collection bags for superior particle capture.
- Extended hose lengths to accommodate larger or multi-room sanding jobs.
- Spare maintenance items, including seals, gaskets, and motor brushes.
- Specialized add-ons such as telescoping pole sanders or precision corner tools.
Factors That Affect Final Cost
Several variables influence the total expense of acquiring and operating a dust-free system. The table below outlines key considerations:
| Factor | Cost Impact | Examples |
|---|---|---|
| Equipment quality | Moderate | Contractor-grade models offer extended durability and consistent performance under heavy use. |
| Filter type | High | HEPA-rated filters elevate initial and replacement costs while significantly boosting air purity. |
| Project size | Variable | Extensive wall areas demand more sanding media and potentially longer runtime. |
| Labor expertise | Medium | Experienced operators complete tasks quicker, reducing overall time and material needs. |
Why Dust-Free Systems Matter
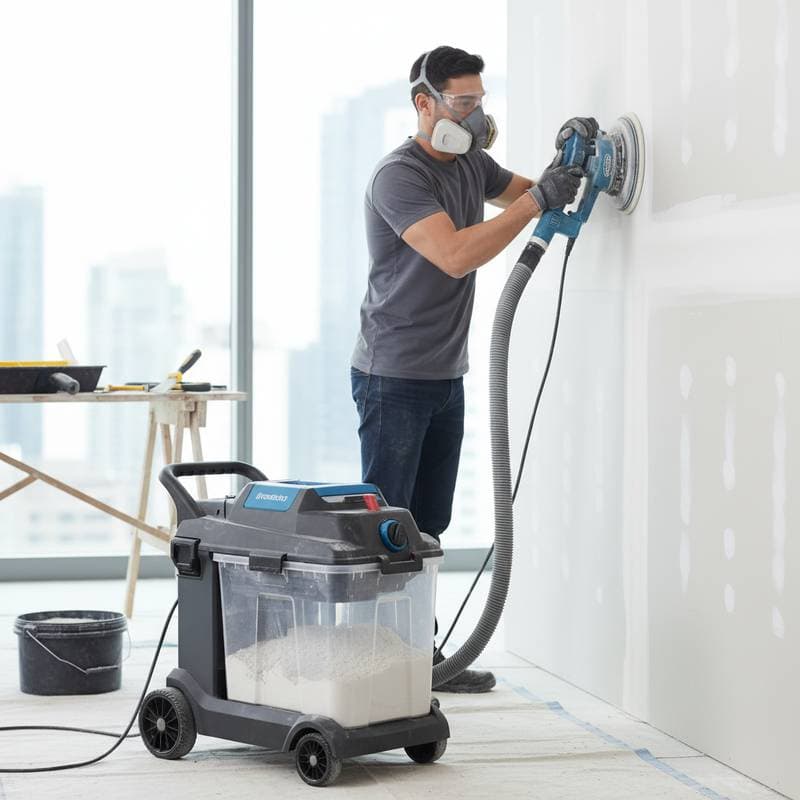
Conventional drywall sanding generates substantial amounts of fine dust that permeates the entire work area. Particles smaller than 10 microns can remain suspended in the air for hours, posing risks to respiratory health and complicating subsequent tasks like painting. Dust-free systems address this by employing vacuum-assisted heads that extract over 99 percent of generated debris before it escapes.
The immediate containment of dust leads to substantial time savings in cleanup. What once required hours of sweeping, wiping, and vacuuming now takes minutes. Homeowners enjoy reduced exposure to irritants, while contractors maintain professional standards by delivering pristine sites upon completion.
Beyond health and efficiency, these systems contribute to higher-quality outcomes. Smoother surfaces emerge from controlled sanding, minimizing the need for rework. Professionals often recover the $800 investment after just two or three jobs through labor savings and client satisfaction.
The Sanding Process and Timeline
Implementing a dust-free system aligns closely with traditional drywall preparation methods, ensuring familiarity for users. Begin by thoroughly inspecting walls for defects such as cracks or uneven joint compound. Apply filler to imperfections, tape seams with mesh or paper, and allow drying times as specified by the manufacturer, typically 24 hours.
Once prepared, attach the sanding head to the vacuum hose and select an appropriate grit, starting with 120 for rough smoothing and progressing to 220 for final finishes. Activate the vacuum before sanding to establish suction. Move the head in circular or linear patterns, applying light pressure to avoid gouging the surface.
For a standard 12-by-12-foot room with average wall height, experienced users complete the process in two to four hours. Larger spaces or multiple coats extend this to a full day. The key advantage lies in the ability to proceed directly to priming or painting, as minimal dust residue remains after a quick final wipe-down.
Professional vs. DIY Use
Professionals benefit most from robust $800 systems designed for frequent, high-volume work. These units feature powerful motors and reinforced components that withstand daily use across job sites. Contractors appreciate the portability and quick setup, which integrate seamlessly into broader renovation workflows.
DIY enthusiasts, on the other hand, often opt for scaled-down versions under $600 to handle occasional home projects. These lighter models suffice for single-room tasks but may require more frequent breaks to manage heat buildup. Regardless of approach, proper technique remains essential: maintain consistent speed and overlap strokes by 50 percent for even results.
Choosing between professional and DIY depends on project scope and frequency. For one-off renovations, a basic DIY kit provides value without overwhelming investment. Frequent users find professional-grade tools pay dividends in reliability and finish quality.
Planning Your Project
Effective planning ensures a dust-free sanding project runs smoothly from start to finish. Assess the total square footage of walls and ceilings to determine system power needs; rooms over 500 square feet benefit from higher-capacity vacuums. Gather materials in advance, including extra sanding media in grits suited to your wall's condition.
Schedule work during off-peak hours if dust sensitivity affects household members, and cover adjacent areas with plastic sheeting despite the system's efficiency. Test the setup on a small section to verify suction strength and adjust as needed. Budget for post-project air quality checks, such as running HVAC filters through a wash cycle.
Consult local building codes for any ventilation requirements during renovations. If hiring a contractor, request demonstrations of their dust-free equipment to confirm compatibility with your timeline. With thorough preparation, the project transforms from a chore into a streamlined step toward a polished space.
Frequently Asked Questions
How much does a dust-free drywall sanding system cost?
Professional-grade systems generally range from $700 to $900, offering balanced performance for regular use. Consumer-oriented models begin around $500, providing entry-level features for home projects. Advanced options with enhanced filtration push costs toward $1,300.
How long does drywall sanding take with a dustless system?
Sanding a standard room typically requires two to four hours, depending on surface area and complexity. This timeframe excludes preparation and drying but includes the efficiency gains from reduced cleanup. Larger areas may extend to eight hours for comprehensive coverage.
Is dust-free sanding suitable for DIY projects?
Absolutely, compact systems make it accessible for homeowners tackling renovations independently. Start with user-friendly models that include instructional guides. Professional units excel in demanding scenarios, but DIY versions deliver clean results with practice.
How can I confirm my contractor uses a true dust-free system?
Request a close look at the vacuum integration and filtration specifications. Authentic setups feature airtight hose connections and HEPA-compliant filters. Observe a demonstration to ensure dust capture occurs at the sanding head without visible plumes.
What are the primary benefits beyond cleanliness?
Key advantages include accelerated project timelines, enhanced respiratory safety, and refined surface preparation for flawless paint adhesion. Users achieve professional-level finishes without extensive post-sanding remediation. Long-term, systems reduce wear on tools and home systems from dust accumulation.
Are replacement filters or accessories expensive?
Recurring costs for HEPA filters and sanding discs remain moderate, often $50 to $100 annually for active users. Invest in quality replacements to sustain performance. Bulk purchases lower per-unit expenses, and proper care extends component lifespan.
Achieve Superior Results with Dust-Free Efficiency
Adopting a dust-free sanding system elevates every renovation by prioritizing precision and purity. Homeowners gain confidence in managing dust challenges, while contractors streamline operations for repeat business. The $800 investment unlocks enduring benefits: healthier spaces, time savings, and finishes that stand the test of time. Consider integrating this technology into your next project for transformative improvements.


