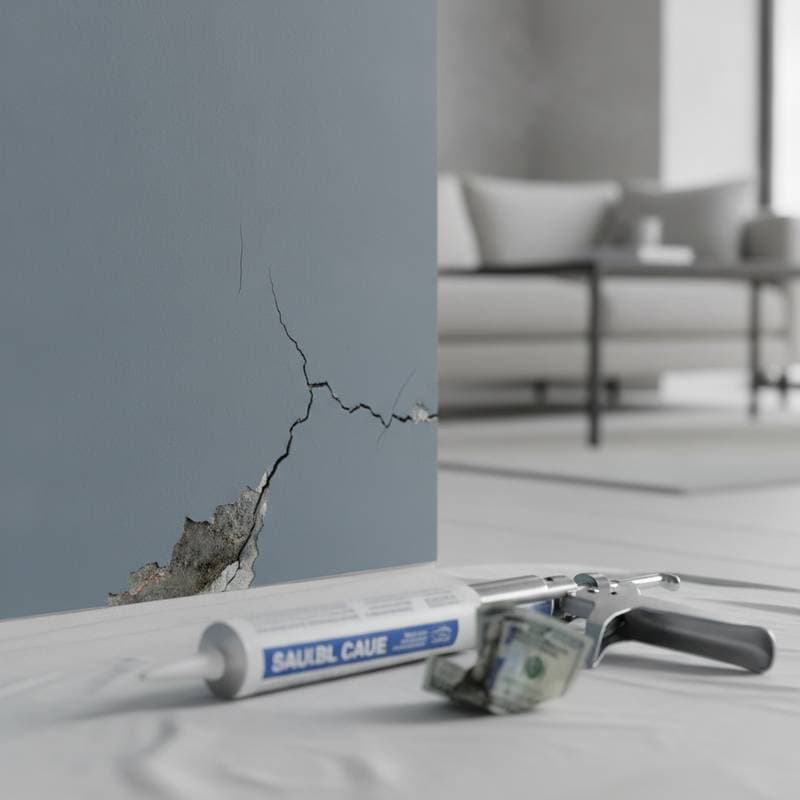
The $500 Mistake of Skipping Caulk Before Painting
A flawless paint job starts long before the first brushstroke touches the wall. One of the most overlooked steps in surface preparation is caulking. Failing to seal gaps and cracks before applying paint can lead to visible imperfections, wasted materials, and costly repairs later.
Homeowners often underestimate this step. They discover only later that skipping caulk adds hundreds of dollars to repainting or repair costs within months. Understanding why caulking matters and what it actually costs helps homeowners make smarter decisions.
Why Caulking Matters Before Painting
Caulking creates a smooth, sealed surface by filling small gaps between trim, walls, windows, and other joints. When these gaps remain unfilled, paint cannot adhere properly. Moisture can seep in, and temperature changes can cause cracking or peeling.
Over time, these small flaws expand. Homeowners then face the need to repaint or repair areas far sooner than expected. Skipping this step can turn what might have been a twenty dollar tube of caulk and an extra hour of labor into a five hundred dollar repair bill.
Average Caulking and Painting Cost Overview
The cost of caulking before painting typically falls between fifty cents and one dollar fifty per linear foot. This range depends on the material type and labor rate. For a standard room with baseboards, window trim, and door frames, total caulking costs usually range between eighty and two hundred dollars when added to a painting project.
By comparison, repairing paint failures caused by missed caulking can easily exceed four hundred to six hundred dollars. Costs rise further if moisture damage spreads.
| Project Type | Average Cost Range | What Is Included |
|---|---|---|
| Standard room caulking | $80 - $200 | Trim, baseboards, windows, doors |
| Full interior repaint after failure | $400 - $600 | Sanding, patching, repainting affected areas |
| Moisture repair and repaint | $600 - $1,000 | Drywall repair, mold treatment, repainting |
Factors Affecting Caulking and Painting Costs
Several variables influence the total cost of caulking before painting. Understanding these factors helps homeowners plan realistic budgets.
Material quality plays a key role. High quality acrylic or silicone caulks cost more upfront, yet they last longer and resist cracking. Cheap caulk often dries too quickly or loses adhesion. Premium options may add twenty to fifty dollars to total project costs but can extend paint life by several years.
Surface condition also matters. Old paint, deteriorated trim, or cracked drywall require extra prep before caulking. Painters may need to scrape, clean, or sand areas to ensure proper adhesion. This preparation can add twenty five to seventy five cents per linear foot to the cost.
Labor and access affect pricing as well. Intricate trim designs, tall walls, or hard to reach corners increase the time required for proper sealing. Labor costs may rise from forty to seventy five dollars per hour depending on project complexity.
Climate and moisture exposure create additional considerations. Homes in humid or coastal regions experience more expansion and contraction in building materials. Using flexible, moisture resistant caulk is essential in these conditions.
Quality Levels and Cost Comparison
| Caulk Type | Cost per Linear Foot | Lifespan | Key Benefits |
|---|---|---|---|
| Basic latex | $0.40 - $0.60 | 2-3 years | Easy to apply, low cost |
| Acrylic latex with silicone | $0.75 - $1.25 | 5-10 years | Flexible, moisture resistant |
| Premium silicone | $1.25 - $2.00 | 10+ years | Long lasting, excellent adhesion |
Higher grade caulks provide better sealing and durability. This reduces maintenance frequency. Spending an extra fifty dollars upfront can extend the life of a paint job by several years.
The Hidden Costs of Skipping Caulk
When caulking is skipped, paint often fails to seal edges properly. Tiny gaps allow moisture to penetrate behind trim or into drywall. Over time, this creates peeling, discoloration, and sometimes mold growth.
Correcting these issues requires sanding, patching, priming, and repainting. Such work costs far more than the original caulking would have. Paint failure also reduces curb appeal and overall home value.
Money Saving Strategies
Homeowners can reduce costs without compromising quality by following these strategies:
- Combine caulking and painting in one project to minimize labor overlap.
- Complete basic prep such as cleaning trim or removing loose paint before professionals arrive.
- Choose mid grade acrylic latex caulk for most interiors to balance cost and durability.
- Schedule projects during off peak seasons when contractors offer better rates.
- Inspect existing caulk annually to address small cracks early before they cause paint damage.
Planning Your Budget
A realistic painting budget should include both visible and hidden preparation steps. Allocating even five to ten percent of the total painting cost to surface prep, including caulking, prevents expensive surprises later. For a two thousand dollar painting project, this means setting aside at least one hundred to two hundred dollars for thorough sealing and prep work.
Ideal Conditions for Interior Caulking and Painting
Mild, dry conditions are ideal, as humidity affects caulk curing and paint adhesion. Scheduling during off peak months can also lower labor costs.


