Level 5 Drywall: Evaluate the $800 Premium for Superior Smoothness
Smooth walls enhance both visual appeal and functionality in any space. Professionals observe their performance under various lighting conditions, from studio setups to natural daylight. The central question remains: does a Level 5 drywall finish warrant the additional $800 cost compared to standard options? This analysis explores the definition of Level 5, scenarios where it provides value, and alternatives for achieving quality results.
Understanding a Level 5 Drywall Finish
Drywall finishing levels range from 0 to 5, with each increment requiring increased labor and materials for greater smoothness. Level 5 represents the pinnacle of quality, commonly specified for luxury residences, television sets, and premium commercial environments. The process involves taping joints and screw heads, applying multiple coats of joint compound, thorough sanding, and a final skim coat over the entire surface.
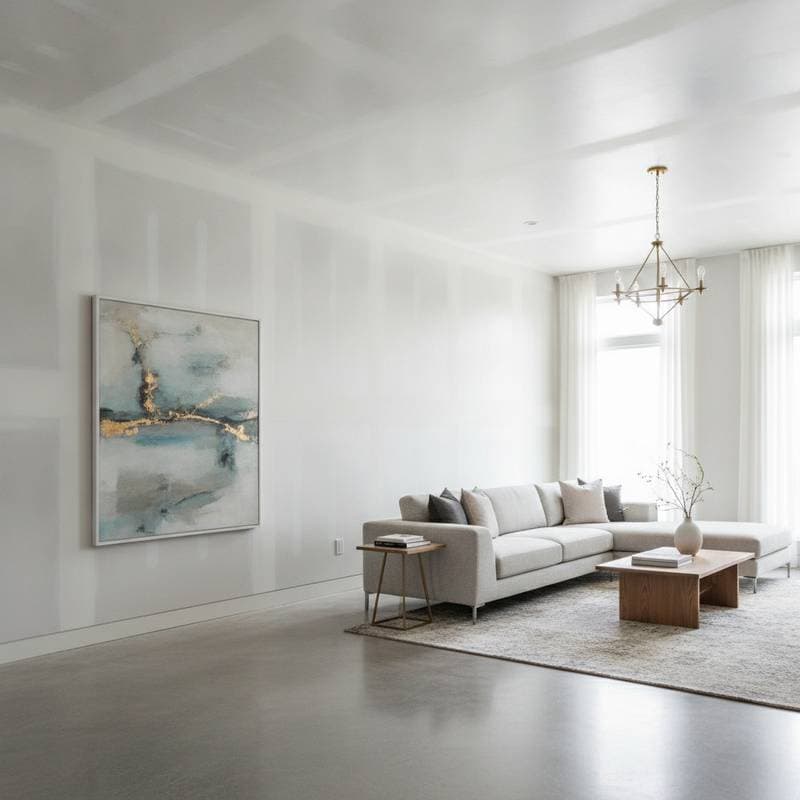
This skim coat, applied by hand or spray, conceals microscopic imperfections and creates a uniform plane. Once painted, the wall appears seamless, with light reflecting evenly to eliminate visible seams or textures. Such a finish supports a gallery-like aesthetic in interior design.
The Purpose of Level 5 Finishing
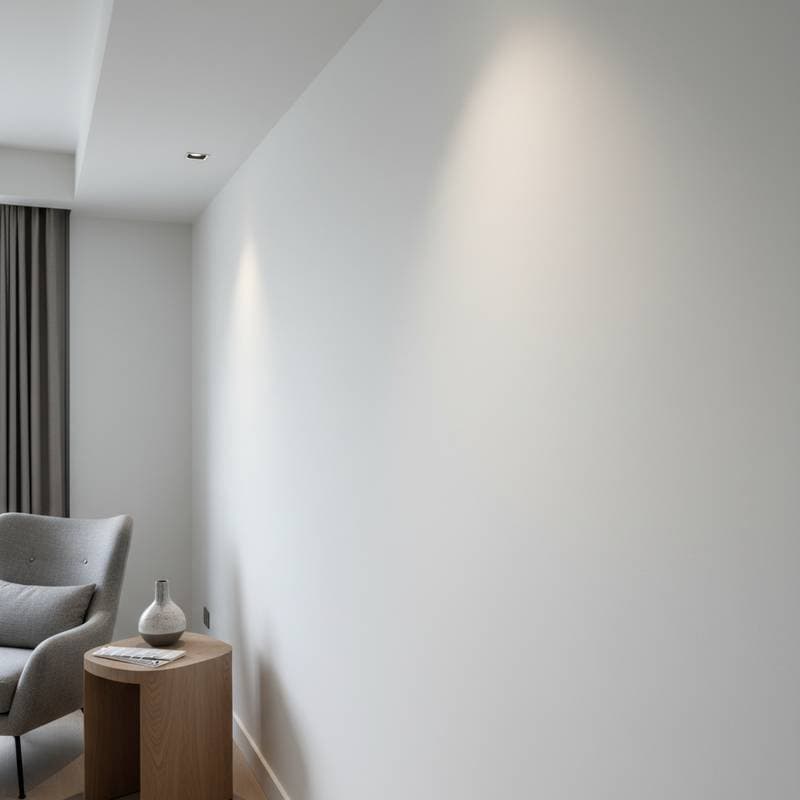
Lighting exposes surface irregularities that casual observation might overlook. Directional illumination, such as from large windows or spotlights, accentuates joint lines and subtle undulations. In residential settings, similar effects occur with accent lighting or high-sheen paints, where faint patterns emerge along walls.
Experience from television renovation projects highlights this necessity. Walls treated with a full skim coat maintained uniformity under intense lighting, whereas untreated surfaces appeared inconsistent. The principle holds: illumination combined with paint reveals the true quality of preparation. Level 5 ensures that revelation displays excellence.
Ideal Applications for Level 5
Level 5 excels in specific contexts where surface perfection directly impacts perception. Consider these targeted uses.
-
Rooms with abundant natural light. Direct sunlight across walls amplifies textures; Level 5 diffuses reflections for consistent appearance throughout the day.
-
Surfaces painted in high-gloss or semi-gloss sheens. These finishes mirror light, magnifying flaws; a Level 5 base prevents visible defects.
-
Accent walls with bold colors. Saturated hues emphasize irregularities; smooth preparation preserves color integrity.
-
Extended hallways or open layouts. Continuous expanses reveal imperfections over distance; Level 5 maintains linearity.
-
Professional environments. Offices, galleries, and studios demand polished surfaces that convey professionalism and brand reliability.
Scenarios to Forego Level 5
Standard Level 4 finishing suffices in many areas, providing tape, two coats of compound on joints and fasteners, and final sanding. Flat or matte paints in low-light rooms, such as bedrooms or basements, mask differences effectively. Closets and utility spaces rarely benefit from the upgrade.
In indirect lighting with forgiving paints, allocate resources to elements like trim or fixtures instead. Effective design prioritizes equilibrium between cost and outcome.
Cost Analysis of the Upgrade
The $800 premium typically accounts for skim coating labor and materials in a medium-sized room, though regional factors and square footage influence totals. Compare these approaches.
Budget Option (Partial DIY Skim Coat):
Target visible walls facing light sources. Apply quality joint compound with a thick-nap roller, then level with a wide knife. This method demands time but yields improvement; budget $100 to $200 for supplies.
Standard Professional (Level 4):
Includes comprehensive taping, mudding, and sanding for reliable results in typical conditions. Professionals complete this efficiently.
Premium Professional (Level 5):
Adds the skim coat for $800 or more on average jobs, ensuring precision and versatility under any lighting or paint.
For walls that demand photographic quality and durability, the investment proves justifiable. In subdued settings favoring warmth, Level 4 delivers adequately.
Professional Techniques for Level 5
Achieving Level 5 requires methodical execution. Follow this sequence employed by skilled contractors.
-
Preparation and Inspection. Ensure surfaces are clean, dry, and securely taped.
-
Skim Coat Application. Spread compound uniformly across all areas using trowel or sprayer.
-
Drying and Smoothing. Allow full drying, then sand lightly to eliminate high spots.
-
Lighting Check. Rake light across the surface to identify and correct inconsistencies.
-
Priming. Apply primer to seal and unify the base; add a second coat if irregularities persist.
Consistency in skim coat thickness demands expertise, blending technical skill with practiced technique.
Influence of Paint Sheen on Finish Choice
Paint type interacts critically with drywall preparation. Review these pairings.
-
Flat and Matte Sheens: Absorb light to conceal minor flaws; Level 4 performs well.
-
Eggshell and Satin Sheens: Offer moderate reflection; enhanced sanding or partial skim aids results.
-
Semi-Gloss and Gloss Sheens: Amplify textures; Level 5 is essential.
Test paint on a primed sample under angled light. Uneven sheen indicates the need for additional finishing.
Practical DIY Approaches
Homeowners can approximate smoothness with targeted efforts.
-
Select wide trowels for even compound distribution.
-
Dilute compound to a creamy consistency for easier application.
-
Apply in overlapping sections to avoid lap marks.
-
Sand with fine-grit paper on a pole sander, maintaining even pressure.
-
Evaluate under raking light to refine areas.
These steps yield an intermediate finish suitable for flat or eggshell paints, enhancing outcomes without full professional intervention.
Contractor and Designer Considerations
Contractors benefit from offering Level 5, as it differentiates services and minimizes rework from discerning clients. In property development or staging, superior walls accelerate sales through enhanced visuals.
Designers note that smooth surfaces elevate overall space value, providing a neutral canvas for furnishings and decor. Upgrade focal areas like entryways to achieve luxury on a budget, focusing on high-impact zones.
Durability and Upkeep
Level 5 surfaces endure better over time, with uniform sealing that simplifies future repairs. Touch-ups blend seamlessly, and repaints maintain consistency.
For maintenance, wipe with a damp cloth and mild soap. Feather repairs broadly and prime affected panels to preserve uniformity.
Lighting Dynamics in Design
Set experience demonstrates how angles intensify texture visibility. Side or window light rakes surfaces, exposing ridges; overhead sources soften but highlight gloss lines. Level 5 ensures reliability across conditions, standard for media interiors.
Essential Recommendations
-
Plan Level 5 during initial stages, prior to priming.
-
Allocate budget to prominent walls.
-
Employ high-quality primer for early flaw detection.
-
Select lighting that complements wall preparation.
-
Assess under natural light for accurate evaluation.
Realizing Design Benefits
A Level 5 finish contributes to daily living through its subtle elegance. It frames artwork and accents with precision, fostering a serene environment. Whether pursuing refined luxury or practical efficiency, informed choices ensure walls support broader design goals effectively.