The Value of Sanding Between Coats in DIY Painting
A seamless paint finish appears simple, yet DIY enthusiasts often encounter challenges like visible brush marks or uneven surfaces. These issues arise from minor imperfections that accumulate without intervention. Sanding between coats addresses these problems directly, transforming ordinary applications into polished outcomes that rival professional work.
This technique ensures each layer integrates smoothly with the previous one. Professionals rely on it for consistency across projects, from furniture restoration to full room updates. By incorporating sanding, you invest time upfront for superior long-term appearance and performance.
Core Reasons to Sand Between Coats
Sanding serves a precise function beyond mere surface smoothing. Fresh paint dries with subtle irregularities, such as embedded dust particles or faint stroke lines. Without sanding, subsequent coats amplify these defects, leading to a textured or inconsistent final layer.
Light abrasion creates a uniform profile that promotes better layer bonding. This step minimizes risks like cracking or delamination over time. The result is enhanced visual appeal and extended surface longevity, particularly in high-traffic areas.
Paint Adhesion Fundamentals and Preparation Essentials
Effective paint adhesion depends on surface cleanliness and optimal texture. Glossy or contaminated surfaces resist new paint, causing weak bonds. Sanding strikes the balance by dulling the sheen and dislodging debris without excessive material removal.
Neglecting this preparation invites common failures, including bubbling or flaking, especially on cabinets or trim exposed to handling. Quality paints demand this step to perform at their best. Proper execution guarantees a resilient finish that withstands daily use.
Project Cost Considerations
Budgeting for a painting project involves accounting for materials and effort. Sanding adds minimal expense but significant value. Understanding cost elements helps in planning without surprises.
Typical Cost Ranges
- Small-scale work, such as a single piece of furniture: $50 to $150
- Medium efforts, like cabinet refinishing: $250 to $600
- Extensive renovations, including multiple rooms: $800 to $1,500
Standard Inclusions
- Sandpaper in fine grits and sanding aids
- Dust removal tools, including cloths and rags
- Base paints, primers, and sealers
- Time allocated for preparation, application, and finishing
Additional Expenses
- Power tools like random orbital sanders: $50 to $150
- Vacuum systems or protective masks
- Fillers for surface repairs
- Advanced paints for specialized effects
Key Cost Influences
| Factor | Impact Level | Specific Examples |
|---|---|---|
| Initial Surface State | Moderate | Heavily textured walls demand extra prep |
| Selected Paint Variety | Moderate | High-gloss options require finer sanding |
| Overall Project Scope | High | Expanded areas elevate material needs |
| Finish Precision Level | Variable | Premium smoothness involves multiple passes |
Step-by-Step Guide to Sanding Between Coats
Follow these steps to integrate sanding effectively into your workflow. Each phase builds on the last for optimal results.
Select Appropriate Abrasives
Opt for sandpaper graded 220 to 320 grit for most applications. This range provides sufficient tooth for adhesion without deep scratches. Test on a small area to confirm compatibility with your paint type.
Allow Complete Drying
Patience prevents damage during sanding. Latex paints typically require four to six hours, while oil-based varieties need up to 24 hours. Verify dryness by pressing lightly; the surface must resist indentation.
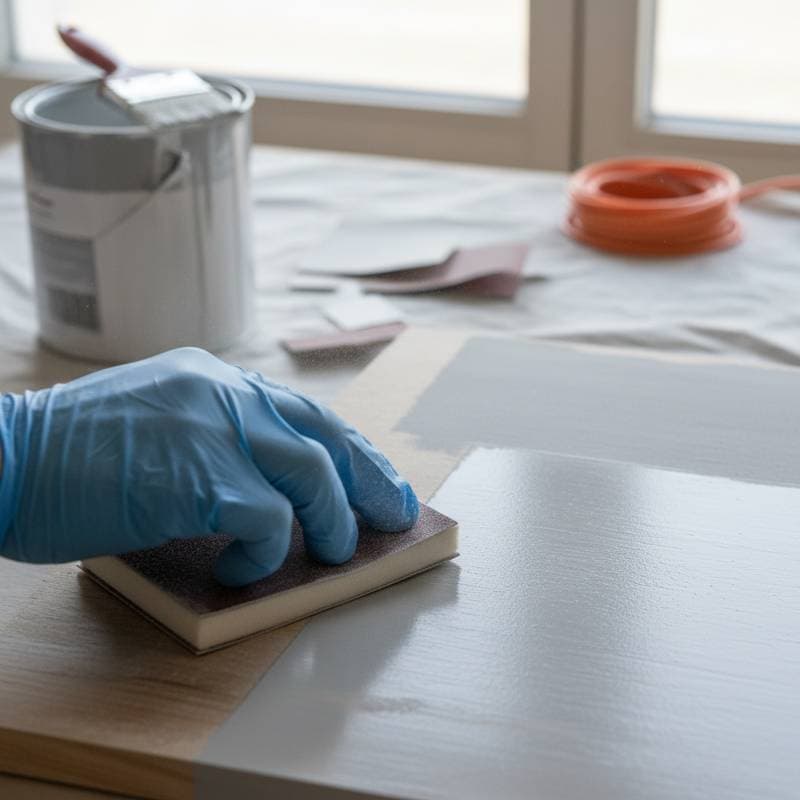
Perform Even, Gentle Sanding
Use light, consistent strokes in circular patterns to avoid grooves. Focus on high spots or rough areas first. The finished surface should exhibit a uniform matte appearance, ready for the next application.
Thorough Dust Removal
Eliminate residue with a tack cloth or damp microfiber towel. Inspect under light to catch lingering particles. Cleanliness ensures the subsequent coat adheres without embedded flaws.
Proceed with Even Application
Apply the following coat promptly after cleaning, using steady brush or roller techniques. The prepared surface allows paint to self-level, reducing visible tool marks.
Evaluating DIY Versus Professional Services
Decide between self-directed efforts and expert assistance based on project demands. Each approach offers distinct benefits and challenges.
Benefits of Handling It Yourself
Cost savings apply to modest undertakings. You gain practical skills and customize choices freely. Flexible scheduling suits personal timelines.
Drawbacks of the DIY Method
The process extends over days with multiple drying intervals. Adequate airflow and equipment protect health and surroundings. Errors may necessitate rework, increasing frustration.
Advantages of Professional Involvement
Experts deliver uniform quality through proven methods. They manage preparation meticulously, minimizing oversights. Completion occurs efficiently, freeing your schedule.
Limitations of Hiring Out
Fees reflect expertise and scale. Appointments demand coordination. Less direct oversight reduces personalization opportunities.
Indicators for Professional Assistance
Consider experts when projects exceed personal capacity. Large-scale interiors or intricate details benefit from their tools and experience. Time limitations or complex surfaces, like ornate moldings, signal the need for help. If prior attempts yielded subpar results, professionals ensure success without repeated trials.
Strategies for Effective Project Planning
Outline your approach to streamline execution. Assess the space and gather supplies in advance. Set a timeline accounting for drying periods between coats. Test paints on inconspicuous spots to confirm color and finish. Document progress to track layers and adjustments. This preparation reduces interruptions and enhances overall satisfaction.
Common Queries on Sanding Practices
Does Sanding Increase Project Expenses Significantly?
Supplies remain affordable, typically $10 to $40 for basics. Labor investment represents the primary addition, with each pass requiring one to three hours depending on scale. Larger or detailed work amplifies this commitment.
What Drying Interval Precedes Sanding?
Timelines vary by formulation and environment. Latex options suit sanding after four hours in moderate conditions. Oil paints demand overnight or longer; always confirm tactile hardness before proceeding.
Is Sanding Dispensable with Certain Paints?
Light sanding enhances all types, including primers and premiums. Base layers prepare substrates, but inter-coat abrasion maintains uniformity. Skipping it risks adhesion inconsistencies across the build-up.
Which Sandpaper Grit Suits Inter-Coat Work?
Grades from 220 to 320 provide the right balance. Finer options suit delicate finishes, while slightly coarser aid tougher bonds. Adjust based on paint viscosity and desired smoothness.
How to Gauge Sufficient Sanding?
Seek a velvety, non-reflective texture. Persistent shine indicates incomplete coverage. Cease once uniformity prevails to preserve layer integrity.
What Pitfalls Arise in Sanding?
Overzealous pressure creates dips; incorrect grits cause visible lines. Neglected cleanup introduces specks in fresh coats. Adhere to drying protocols and methodical techniques for avoidance.
Realizing Enduring, Flawless Finishes
Incorporating sanding elevates every paint endeavor. This practice yields surfaces that endure wear while captivating the eye. Apply these insights to your next project for results that inspire confidence and pride.


