TSP Banned: Master 2025 Paint Prep Alternatives
Trisodium phosphate, commonly known as TSP, served as a standard cleaner for preparing surfaces before painting. This product effectively removed grease, soot, and accumulated grime. However, environmental regulations have restricted its use due to the release of phosphates into water systems, which contribute to algae blooms and harm aquatic ecosystems. Painters now rely on safer substitutes that achieve comparable results while minimizing environmental impact.
Reasons for the Shift Away from TSP
TSP provided powerful cleaning action, but its phosphate content posed significant risks to waterways. Many local and regional authorities prohibit or strongly advise against its application, particularly near drainage areas. This transition reflects broader advancements in cleaning formulations that prioritize both efficacy and sustainability. Professional painters adapt by selecting alternatives that ensure thorough surface preparation without compromising safety.
Essential Goals of Paint Surface Preparation
Effective preparation creates a surface that accepts paint uniformly, resulting in a smooth finish and long-lasting adhesion. Residues such as oils, dust, or contaminants can lead to peeling, bubbling, or inconsistent color application. Tailor the cleaning method to the specific surface and type of soiling: degrease kitchen areas, remove soap scum in bathrooms, and combat mildew on exteriors. Identifying these factors simplifies the selection of an appropriate cleaner.
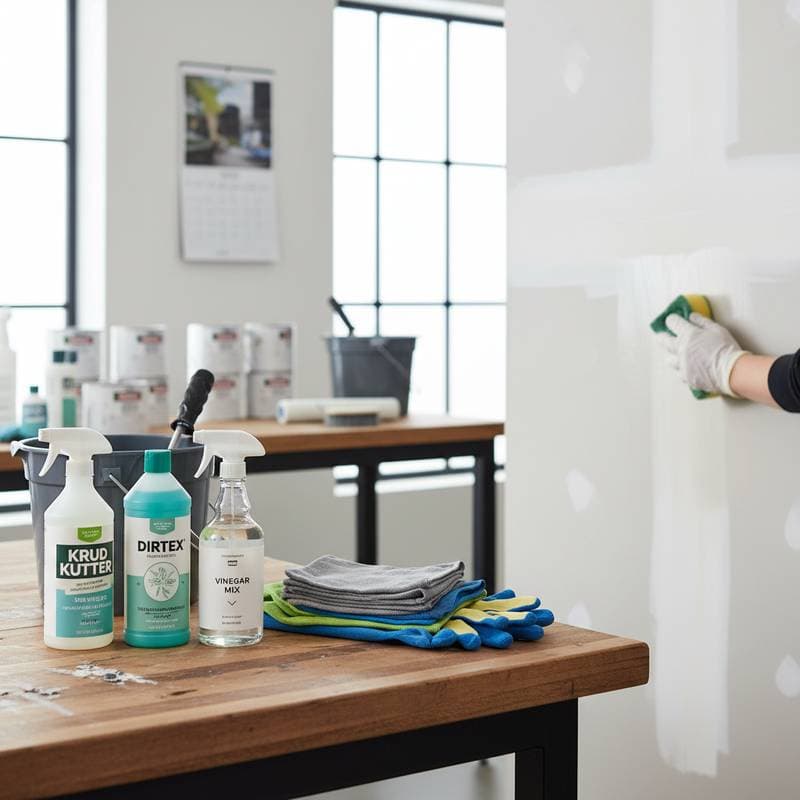
Recommended TSP Alternatives by Budget and Application
These alternatives undergo testing in professional settings, including job sites, residential projects, and workshops. Each option offers improved safety, simpler rinsing, and reduced environmental footprint compared to TSP.
Budget-Friendly Option: Vinegar and Warm Water Solution
Combine one part white vinegar with three parts warm water in a spray bottle. For greasy surfaces, incorporate a small amount of mild dish soap into the mixture. Apply the solution to the surface, allow it to sit for several minutes to loosen dirt, then scrub gently with a soft sponge or cloth. Rinse thoroughly with clean water and permit complete drying before proceeding to painting. This method suits lightly soiled interior walls and proves economical with negligible residue.
Mid-Range Choice: Krud Kutter Prepaint Cleaner
Krud Kutter stands out for its ability to degrease surfaces efficiently using biodegradable ingredients. Dilute the concentrate according to product instructions, typically one part cleaner to three parts water. Spray the solution onto the area, let it penetrate for two to five minutes, and scrub as needed before rinsing with fresh water. The surface prepares quickly for primer or direct paint application, making this ideal for cabinets, trim, and walls exposed to cooking residues.
Higher-End Selection: Dirtex Powder Cleaner
Dirtex provides robust cleaning power in a phosphate-free powder format that dissolves readily in warm water. Prepare a solution by mixing two tablespoons of powder per gallon of water, stirring until fully dissolved. Apply with a sponge or brush, focusing on heavily soiled areas, and agitate to lift grime. Rinse multiple times to eliminate any traces, ensuring the surface remains film-free. This cleaner excels on exteriors or smoke-damaged interiors where substantial buildup requires attention, justifying its higher cost through superior performance.
Specialty Alternative: Phosphate-Free TSP Substitutes
Products labeled as phosphate-free TSP substitutes replicate the original's strength while avoiding harmful runoff. Select formulations certified for low environmental impact and follow dilution guidelines, often one ounce per gallon of water. Soak the surface for ten minutes, scrub vigorously, and rinse completely. These cleaners prove effective for large-scale repainting projects or wood refinishing, balancing potency with ecological responsibility.
Step-by-Step Process for Optimal Surface Preparation
Follow these procedures regardless of the chosen cleaner to maximize results.
- Protect adjacent areas by applying painter's tape to trim, covering floors with drop cloths, and removing or shielding hardware.
- Clean from top to bottom to prevent drips from redistributing dirt to already cleaned sections.
- Employ two buckets: one containing the cleaning solution and the other filled with rinse water to avoid reapplying contaminants.
- Allow the surface to air dry fully, which may take several hours depending on humidity and ventilation.
- Inspect and lightly sand any glossy or uneven spots to promote better primer adhesion.
Implementing these steps elevates preparation from basic to professional quality, ensuring durable outcomes.
Tailoring Cleaners to Specific Surfaces
- Drywall or Plaster: Opt for the vinegar solution or Krud Kutter to maintain gentleness on underlying paint layers while removing light residues.
- Cabinets and Trim: Choose Dirtex or a phosphate-free substitute for thorough grease removal and smooth priming preparation.
- Exterior Siding: Select Dirtex or a mildew-specific exterior cleaner, applying with a pressure washer for enhanced efficiency on vertical surfaces.
- Masonry or Brick: Pair a phosphate-free substitute with a stiff-bristled brush to effectively dislodge embedded dust and efflorescence.
Always test the cleaner on an inconspicuous area and allocate sufficient drying time for each surface type. This approach prevents damage and verifies compatibility.
Achieving Lasting Results Through Proper Preparation
A meticulously prepared surface transforms the painting process into an efficient endeavor, with paint applying evenly and colors appearing vibrant. Transitioning from TSP to these alternatives advances sustainable practices without sacrificing quality. Painters at all levels benefit from methods that align with environmental standards and deliver reliable performance. Focus on material compatibility and thorough execution to secure finishes that endure over time.


