The Essential Role of Paint Stripping in Professional Prep Work
Proper surface preparation determines the longevity of any paint application. Experts emphasize that removing old paint layers ensures strong adhesion and prevents future peeling or cracking. In 2025, professionals rely on advanced methods that prioritize efficiency, safety, and preservation of underlying materials. This overview examines key techniques, helping readers select approaches suited to specific projects.
Core Paint Stripping Techniques
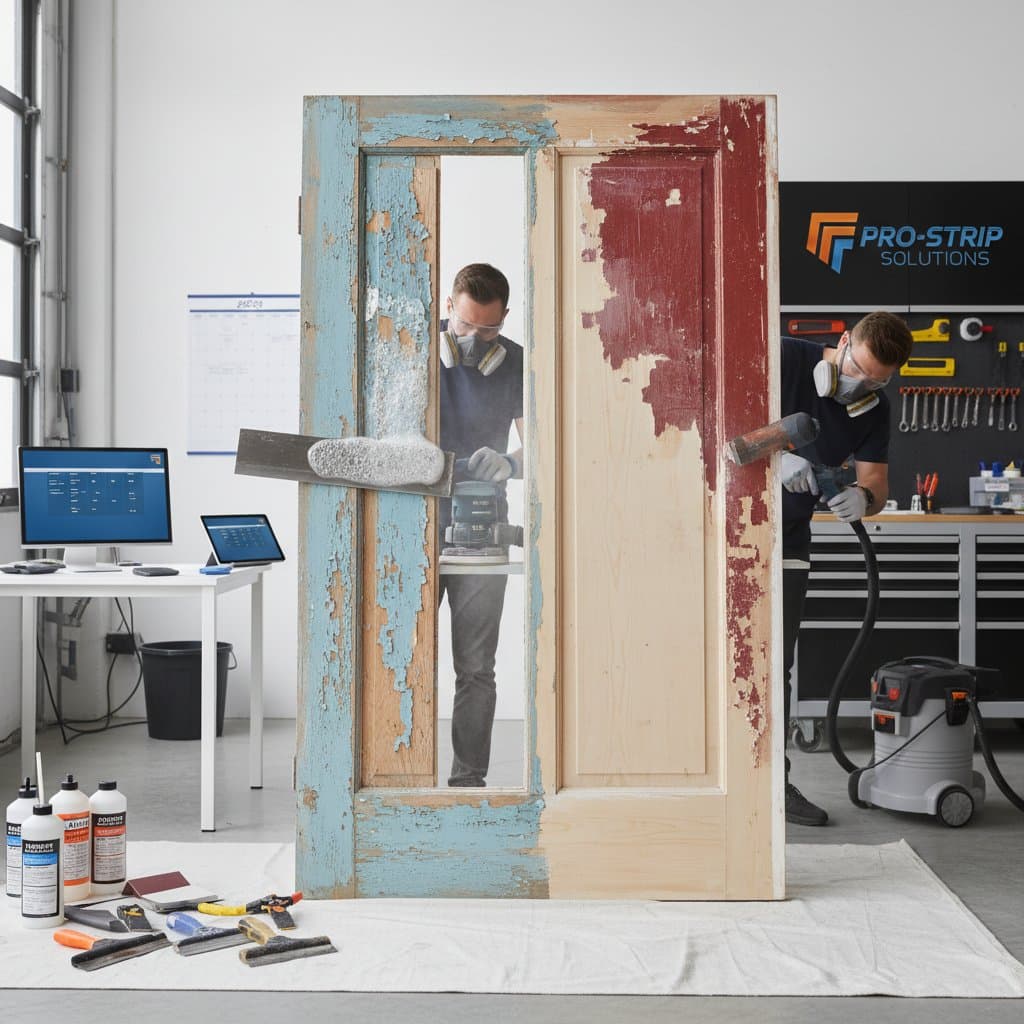
Paint stripping clears away deteriorated coatings to reveal a stable base for new applications. The process targets issues like flaking or uneven layers that undermine paint performance. Professionals evaluate surface type, paint composition, and environmental factors before choosing a method. The primary options encompass chemical applications, mechanical abrasion, thermal softening, and integrated strategies.
- Chemical applications involve solvents in liquid or paste form that penetrate and dissolve paint bonds.
- Mechanical abrasion employs tools to physically erode coatings from the substrate.
- Thermal softening uses targeted heat to loosen paint for manual removal.
- Integrated strategies combine elements from multiple methods to address complex challenges.
Each technique suits particular scenarios, such as detailed woodwork or expansive exteriors.
Detailed Cost Analysis for Paint Stripping Projects
Typical Price Ranges
Budgeting accurately requires understanding scale and complexity. Small-scale efforts, like treating a single interior panel, range from $150 to $350. Medium endeavors, covering a room or outdoor segment, fall between $400 and $900. Comprehensive undertakings, such as full-home exteriors or ornate features, span $1,000 to $3,000.
Standard Inclusions
Professional services typically cover labor for removal and post-process cleanup. Teams apply protective coverings to adjacent areas and perform basic repairs to minor surface flaws. Disposal of debris follows established protocols to maintain site tidiness.
Additional Expenses
Certain elements incur extra charges. Lead content assessment and compliant abatement add significant fees due to regulatory demands. Intensive abrasion or restoration work increases labor hours. Specialized formulations for sensitive substrates, like antique wood, elevate material costs. Supplementary primer layers or sealants may also apply if the surface demands them.
Key Influences on Pricing
| Factor | Impact on Cost | Specific Examples |
|---|---|---|
| Substrate Type | Elevated for intricate or soft materials | Intricate woodwork, ornamental plaster |
| Coating Composition | Increased for durable or layered paints | Oil enamels, historical multi-coat systems |
| Site Accessibility | Moderate uplift | Elevated positions, confined spaces |
| Prep Requirements | Variable rise | Dust barriers, airflow systems |
| Compliance Needs | Fluctuating addition | Hazardous material handling, eco-disposal |
These variables guide estimates, ensuring projects align with financial expectations.
In-Depth Comparison of Stripping Approaches
Chemical Solvent Methods
Advancements in 2025 formulations reduce volatility and enhance user safety. These products apply directly to surfaces, where they dwell to break down paint adhesion before scraping. Professionals favor this for ornate elements, as it avoids altering fine details on moldings or panels. Application involves even coating with a brush, followed by a 15- to 30-minute wait, depending on layer thickness.
Advantages:
- Maintains original surface contours without gouging.
- Demands less manual force, reducing fatigue on detailed jobs.
- Handles stacked layers effectively without excessive penetration.
Disadvantages:
- Potential for lingering residues that require thorough rinsing.
- Necessitates robust ventilation and full-body protection.
- Waste products demand adherence to regional disposal guidelines.
Mechanical Abrasion Techniques
This method utilizes orbital sanders, belt tools, or hand files to grind away coatings progressively. It excels at creating uniform textures ideal for primer bonding. Experts recommend variable-speed devices to control aggression, starting with coarse grits (80-120) for bulk removal and finishing with fine ones (220+) for polish.
Advantages:
- Yields a feathered edge for seamless transitions.
- Eliminates chemical byproducts entirely.
- Addresses surface irregularities during the process.
Disadvantages:
- Demands substantial effort on broad expanses.
- Produces airborne particles needing vacuum-assisted capture.
- Risks over-removal on fragile substrates like thin veneers.
Thermal and Infrared Systems
Devices deliver precise heat, typically 400 to 600 degrees Fahrenheit, to gelatinize paint for lifting. Infrared lamps offer even distribution without direct flame contact, minimizing charring risks. This suits resilient exteriors or vintage layers resistant to solvents.
Advantages:
- Penetrates dense accumulations efficiently.
- Generates no hazardous effluents.
- Performs reliably in open-air settings.
Disadvantages:
- Proceeds methodically, extending overall duration.
- Demands steady hand control to prevent thermal damage.
- Incompatible with heat-sensitive adjacencies like glazing.
Hybrid Application Strategies
Seasoned teams layer techniques for optimal outcomes. Begin with solvent dwell on broad areas, then abrade remnants for clarity. Introduce thermal bursts for holdouts, concluding with fine manual passes. This sequence, applied to a Victorian trim project, can halve time while safeguarding integrity.
Realistic Timeline Projections
Project duration hinges on scope and conditions. Compact tasks, such as a doorway unit, conclude in 2 to 4 hours, encompassing setup and verification. Room-scale interiors extend to 1 to 2 days, factoring dwell periods and ventilation cycles. Exterior full-builds span 3 to 7 days, influenced by sunlight or humidity affecting cure rates. Divide workflows into assessment, execution, decontamination, and inspection phases for streamlined progress.
Deciding Between DIY and Professional Execution
For modest undertakings, like refreshing a chair or brief railing, individuals can manage with basic kits. Essential safeguards include respirator masks, nitrile gloves, and goggles to counter exposures. Test small sections first to gauge efficacy and avoid substrate harm. However, expansive or legacy surfaces with lead risks necessitate certified handlers. Experts deploy industrial vacuums, containment sheeting, and certified abatement to deliver superior uniformity and compliance.
Opting for professionals yields enduring benefits in adhesion reliability and aesthetic precision.
Selecting and Preparing with a Trusted Contractor
Reliable partnerships elevate project standards. Prioritize firms holding current licenses, bonding, and specialized training in remediation. Solicit bids from three providers, probing their protocol for residue neutralization and edge feathering.
Homeowner Preparation Checklist:
- Review certifications and past client feedback.
- Secure itemized proposals delineating supplies and workforce allocation.
- Inquire about protocols for toxin detection and mitigation.
- Clarify accountability for site restoration and refuse handling.
- Define benchmarks for substrate readiness prior to topcoating.
Advance discussions prevent misunderstandings and foster efficient collaboration.
Mapping Out Your Stripping Initiative
Initiate with a site survey to catalog paint conditions and structural vulnerabilities. Assemble supplies based on chosen method, verifying compatibility with substrates like masonry or metal. Schedule around seasonal factors, such as dry spells for exteriors, to optimize outcomes. Post-stripping, conduct a tactile inspection: surfaces should feel uniform and residue-free, primed for enduring finishes.
Addressing Common Queries on Paint Stripping
What Drives the Highest Costs in Paint Stripping?
Surface composition and coating resilience dominate expenses. Elaborate woods or profiled elements demand precise handling, inflating labor. Resilient oils or accumulated strata prolong engagement, amplifying resource use.
How Long Might a Standard Stripping Job Last?
Contained interiors wrap in 4 to 8 hours per segment. Broader exteriors unfold over 2 to 5 days, accounting for phased drying and atmospheric variables.
Should I Tackle Paint Stripping Independently or Engage Experts?
Viable for isolated pieces with standard precautions. Scale up to pros for breadth, antiquity, or hazard potentials, leveraging their specialized apparatus and protocols.
How Do I Identify a Suitable Stripping Specialist?
Scan regional experts with documented prep proficiency. Demand detailed scopes, endorsements, and coverage verification. Transparent communicators outline phased execution and milestones upfront.
What Occurs During Active Stripping Operations?
Anticipate particulate spread, scents, or auditory cues per technique. Interim appearances feature irregularity until refinement. Final checks confirm readiness for bonding layers.
What Issues Arise Post-Stripping and How to Mitigate Them?
Traces of agents, clinging flecks, or dampness imperil subsequent bonds. Enforce complete aeration, selective abrasion, and material harmony checks. Pre-coat evaluations by skilled eyes avert rework.
Achieving Lasting Surface Excellence
Mastering paint stripping unlocks flawless, resilient applications. By aligning methods with project demands, readers secure professional-grade preparations. Invest in informed choices to extend the vibrancy of every repaint, transforming routine maintenance into enduring satisfaction.