Why Sanding Between Coats Saves DIY Painters $500
A smooth paint finish appears simple, but substantial effort occurs before the final layer dries. Sanding between coats stands as an essential, often overlooked step in painting projects. This practice enhances paint adhesion and minimizes the quantity of paint required. Homeowners thus save up to $500 on materials and supplies. Grasping the importance of sanding, its integration into the process, and the issues it averts enables DIY painters to produce professional outcomes without excess expenditure.
The Importance of Sanding for Paint Adhesion
Sanding extends beyond removing old paint; it forms a core element of surface preparation to promote proper bonding of new layers. As paint dries, it captures dust particles, fibers, or drips, forming minor irregularities that hinder even application of subsequent coats. These create subtle elevations and depressions on the surface. Sanding eliminates such defects and imparts a light texture that facilitates grip for the next layer. The result includes reduced coat numbers, uniform coverage, and enhanced durability.
Omitting sanding produces noticeable brush strokes, inconsistent gloss, and eventual peeling. Homeowners then apply additional paint to correct these flaws, squandering time and resources. Consistent sanding circumvents such errors and preserves budgets.
Breaking Down Project Expenses
Typical Cost Ranges
- Basic interior wall painting: $250 to $400
- Standard room repaint including trim: $500 to $900
- Premium finishes or cabinetry work: $1,000 to $1,800
Standard Inclusions
- Primer plus two coats of paint
- Sanding supplies like fine-grit paper or pads
- Dust removal cleaning materials
- Essential tools such as brushes, rollers, and trays
Additional Expenses
- Specialty paints like high-gloss or enamel
- Drywall or wood surface repairs
- Advanced options such as low-VOC or designer paints
- Contractor fees for partial professional assistance
Influences on Total Costs
| Factor | Cost Impact | Examples |
|---|---|---|
| Surface type | 10% to 25% variation | Rough plaster or textured walls demand more sanding and paint |
| Paint quality | 15% to 40% variation | High-end paints offer superior coverage yet higher per-gallon price |
| Preparation quality | +/- 20% | Thorough sanding and cleaning lower paint use |
| Application technique | +/- 15% | Spraying consumes more paint than brushing or rolling |
Neglecting sanding leads to irregular coverage, necessitating surplus coats. Each extra layer may require an additional gallon of paint, elevating expenses by hundreds of dollars.
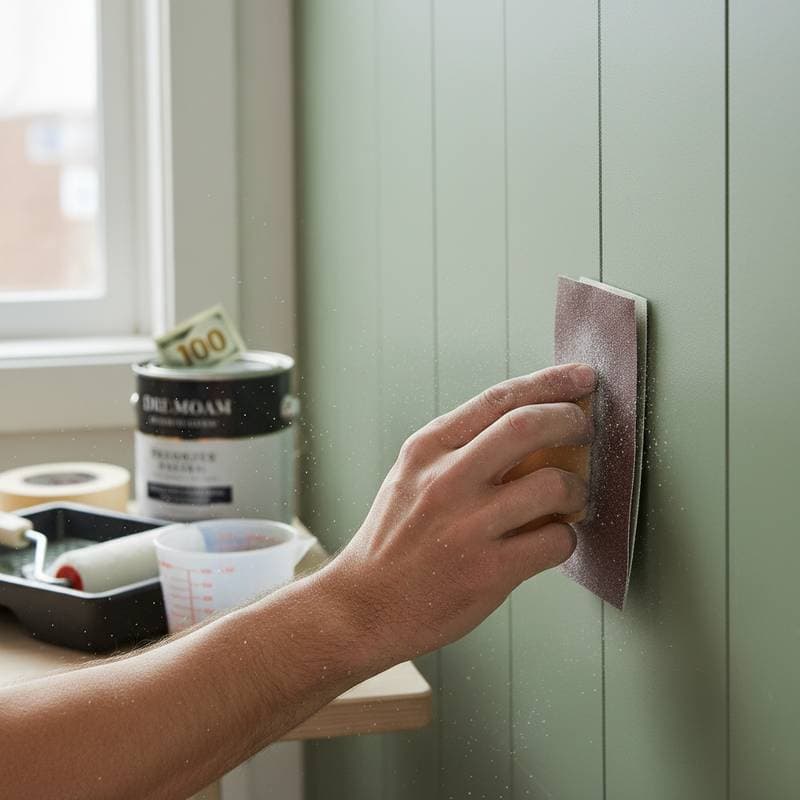
Executing Sanding Between Coats
Sanding between coats involves a gentle, precise technique rather than aggressive resurfacing. The objective centers on producing a level, non-shiny surface for optimal bonding of the following layer. Allow the initial coat to dry fully, then employ 220-grit fine sandpaper to lightly abrade the area. Target raised fibers, debris, or solidified drips during this pass. Follow by wiping the surface with a tack cloth or slightly damp rag to eliminate residue prior to the next application.
For elements like woodwork, cabinets, or trim, this step proves indispensable due to their visibility of imperfections. Uneven paint on glossy or inadequately prepared areas peels easily under routine use. Proper execution builds successive layers with increased depth, resilience, and a refined aesthetic.
The Financial Drawbacks of Omitting Sanding
One gallon of paint typically covers 350 to 400 square feet per coat. Absent sanding, surface irregularities and weak adhesion diminish this efficiency by up to 25 percent. Consequently, extra gallons become necessary, each priced at approximately $50. Repainting two or three rooms then accumulates $500 or greater in avoidable outlays for materials and effort.
Inadequate adhesion further diminishes the paint job's longevity. Peeling or bubbling emerges within months, prompting full repaints. The minimal investment in sanding—several sheets of paper and an additional hour—pales against repainting costs, including fresh paint, tools, and labor.
DIY Versus Professional Painting Methods
Required Skills
DIY sanding demands steady patience and meticulous focus. Professionals rely on tools like orbital sanders and sponges for even pressure. Homeowners replicate these effects through careful hand sanding, with frequent progress inspections.
Time Commitment
Allocate one to two hours per standard room for inter-coat sanding. Although this extends the timeline, it forestalls the extensive delays from superfluous coats.
Necessary Tools
- Fine-grit sandpaper or sponge (180 to 220 grit)
- Tack cloth or microfiber cloth
- Dust mask and safety goggles
- Vacuum or duster for residue removal
Safety Protocols
Wear protective equipment to prevent dust inhalation. For older homes with legacy paint, test for hazards and contain dust before proceeding.
Anticipated Results
Professional-grade smoothness underpins superior finishes. Even quality paints fail to conceal flaws from neglected sanding. The contrast between matte, irregular surfaces and sleek, even ones hinges on this procedure.
Expense Analysis
- DIY with sanding: $400 to $900 for typical jobs
- DIY without sanding: $800 to $1,400 from excess paint and fixes
- Professional service including sanding: $1,200 to $2,000 based on project size
These figures illustrate sanding's role in cost management while upholding standards.
Scenarios for Professional Assistance
Large-scale endeavors or repair-intensive surfaces benefit from contractor involvement for sustained value. Experts apply uniform sanding and preparation for enduring outcomes. They manage dust control effectively, safeguarding furnishings and floors. Detailed trim, cabinetry, or humid zones like bathrooms warrant professional expertise for prolonged performance.
Handymen suit minor tasks such as touch-ups or single-room work, whereas licensed painters excel in comprehensive repaints or custom applications.
Setting Up for Effective Sanding
Initiate by scraping loose paint, patching voids, and cleansing surfaces. Contaminants like dirt or oils obstruct sanding and accelerate tool wear. With clean, dry areas ready, apply fine-grit sandpaper in soft circular patterns. Refrain from excessive force to prevent scratches visible under paint.
Post-sanding, vacuum thoroughly and damp-wipe walls or trim. Ensure complete dryness before recoating to secure uniform bonding, color fidelity, and gloss retention.
Frequent Preparation Errors
- Neglecting sanding altogether: This tops costly errors, causing paint waste and adhesion failure.
- Selecting improper grit: Coarse types etch marks; excessively fine ones fail to texture for grip.
- Ignoring dust cleanup: Leftover particles embed in fresh paint, spoiling the layer.
- Excessive edge abrasion: Over-removal of paint or primer yields patchy coverage.
- Hastening coat intervals: Premature sanding on wet paint results in sticky, irregular textures.
Steering clear of these ensures streamlined workflows and consistent quality.
Structuring Your Painting Timeline
Incorporate drying and sanding intervals into your schedule to avoid hasty choices prompting extra layers. Compute paint needs precisely using surface measurements and can specifications. Acquire modest surplus for corrections, but resist bulk buys. Sample colors in situ lighting prior to major purchases.
Tackle rooms sequentially for simplified sanding and cleanup. Maintain sanding supplies accessible to promptly handle fibers or drips.
Achieving Lasting Value Through Preparation
Investing effort in inter-coat sanding yields superior, durable finishes alongside financial gains. Enhanced smoothness curbs paint uptake, bolsters adhesion, and obviates additional layers. From accent walls to full interiors, this method guarantees expert appearances resistant to daily wear. Strategic preparation translates to substantial savings and extended paint life.
Frequently Asked Questions
How Does Sanding Between Coats Lower Paint Expenses?
Sanding yields a level surface promoting even paint spread and strong adhesion. Efficient coverage demands fewer coats, cutting usage by up to 25 percent. This trims both material and labor outlays.
What Problems Arise from Skipping Sanding?
Omission fosters weak bonding, irregular textures, peeling, or bubbling. Attempts to remedy with extra paint inflate costs. Sanding averts these, prolonging the job's viability.


