Pros Avoid This $800 Sanding Mistake – You Can Too
Sanding represents one of the most overlooked steps in painting and refinishing projects. Homeowners often treat it as a minor chore to scuff the surface before applying paint. Professionals recognize that inadequate sanding leads to substantial expenses in materials, labor, and time. The primary error involves neglecting proper preparation or employing incorrect techniques, resulting in costs exceeding $800 when accounting for rework and replacements.
Grasping the reasons behind these issues and implementing preventive measures preserves resources and eliminates aggravation.
Project Cost Breakdown
Average Cost Ranges
- Basic wall sanding and preparation: $150 to $350
- Cabinet or trim sanding: $400 to $750
- Full surface correction following sanding failure: $700 to $1,200
Included Services
- Labor dedicated to thorough surface sanding
- Application of progressive grit levels for optimal smoothness
- Dust extraction and cleaning with tack cloths
- Priming application and detailed inspection prior to painting
Additional Expenses
- Stripping and refinishing of defective paint layers
- Drywall patching due to gouges or irregular sanding
- Replacement of compromised trim or hardware components
- Deployment of specialized tools or dust containment equipment
Influencing Cost Factors
| Factor | Cost Impact | Examples |
|---|---|---|
| Surface condition | Moderate to high | Peeling paint, aged finishes, heavy textures |
| Material type | Moderate | Wood, drywall, metal, composite surfaces |
| Equipment used | Low to moderate | Manual sanding versus orbital sanders |
| Labor complexity | High | Intricate corners, ornate trim, cabinetry |
Common Sanding Mistakes Leading to Costly Repairs
-
Incorrect grit progression
Transitioning abruptly from coarse to fine grit creates scratches that primer fails to conceal, demanding further correction. -
Overlooking dust removal
Fine particles form an invisible barrier impairing primer adhesion. Professionals employ tack cloths or vacuums for complete cleanup before proceeding. -
Excessive pressure application
Aggressive sanding damages drywall paper or thins wood veneers, necessitating patches and additional labor. -
Ignoring edges and corners
Incomplete attention to these areas initiates paint failures, as adhesion weakens in untreated zones. -
Premature painting post-sanding
Lingering dust and static charges draw contaminants, resulting in textured imperfections beneath the paint.
These missteps frequently cause blistering, delamination, or lackluster appearances, escalating to full-scale repaints. The $800 figure materializes through accumulated labor and material losses.
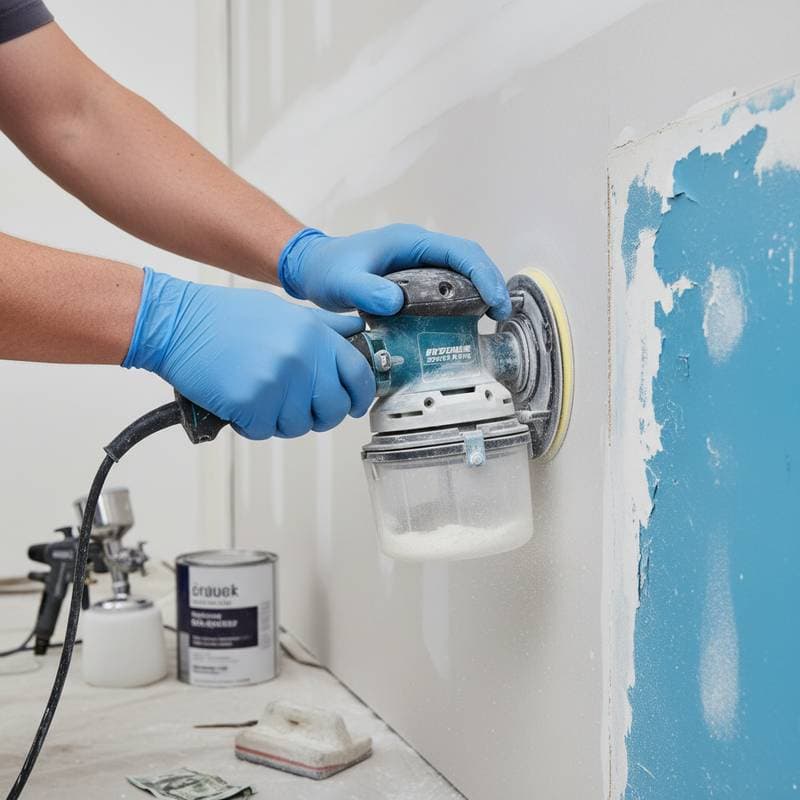
Professional Sanding Techniques
-
Initial surface evaluation
Experts examine for delamination, fissures, or contaminants such as oils and residues that compromise bonding. -
Strategic grit selection
They commence with the coarsest grit required to eliminate defects, then advance methodically to finer options for refinement. -
Effective dust management
Vacuum-equipped sanders and enclosed workspaces reduce airborne particles, maintaining a clean environment. -
Meticulous cleaning
All surfaces receive a final wipe to eradicate residues before any coating application. -
Final quality check
A tactile inspection confirms even texture and identifies lingering flaws for immediate address.
This methodical approach demands additional upfront effort yet delivers reliable adhesion and enduring professional results.
Preparation Steps Before Starting or Hiring
- Define project boundaries. Determine if the task involves furniture restoration, wall repainting, or cabinet renewal.
- Conduct surface inspections. Locate fractures, flaking, or irregularities requiring intensive preparation beyond basic sanding.
- Assemble necessary tools. For independent efforts, secure sanding blocks, assorted grits, vacuums, and tack cloths.
- Safeguard adjacent areas. Deploy drop cloths and masking tape to shield unprotected surfaces from dust and debris.
When engaging professionals, inquire about their grit progression strategy and dust mitigation protocols. Reputable contractors articulate their procedures transparently.
Project Planning Essentials
Effective planning minimizes surprises and optimizes outcomes. Begin by sketching a timeline that allocates sufficient hours for sanding relative to the project's scale; for instance, allocate half a day for a standard room's walls. Budget for potential contingencies, such as unexpected surface repairs, by setting aside 20 percent extra funds. Coordinate material deliveries in advance to avoid delays, ensuring primers and paints arrive post-sanding completion. Finally, document progress with photographs to track improvements and reference during inspections.
Frequently Asked Questions
How can I determine if sanding is required before painting?
Surfaces exhibiting gloss, flaking paint, or irregular textures demand sanding. New drywall also benefits from a gentle scuffing to eliminate manufacturing dust and enhance primer grip.
What grit levels suit walls or cabinets?
For walls, 120 to 150 grit suffices prior to priming. Cabinets and trim call for 180 to 220 grit to yield ultra-smooth results. Progress gradually from coarser to finer abrasives.
How much time does professional sanding require for a typical room?
Experts complete sanding and associated cleanup for an average room in one day, contingent on wall integrity and furniture relocation. Elaborate features or remedial work prolongs this duration.
When does hiring a professional outweigh DIY sanding?
Opt for experts on expansive areas, intricate cabinetry, or histories of paint distress. Their precision averts irregularities and fosters bonds that outlast amateur applications.
What elements belong in a sanding or painting agreement?
Contracts should specify coverage areas, grit sequences, dust handling, cleanup duties, and warranty terms. Such details foster mutual understanding and uphold quality standards.
What issues arise from bypassing proper sanding?
Omitted sanding prompts peeling, bubbling, or mottled paint. Remediation entails stripping, re-preparation, and repainting, incurring hundreds in unforeseen expenses.
Achieving Lasting Results Through Smart Sanding
Investing time in correct sanding techniques pays dividends in project longevity and aesthetic appeal. Homeowners who adopt professional habits avoid the pitfalls of hasty preparation, securing finishes that withstand daily wear. This diligence not only curbs immediate costs but also enhances property value over time.


